
Luminosity Masking Multiple Exposures
Its a big subject so I'll try keep it short and sweet..
I shot heaps of exposures here on my Canon 6D/Tamron 15-30 f/2.8 @ 19mm and chose 4 of which to use;

I used most of the far right exposure for the foreground rocks & water, only the sun star from the far left exposure, most of the sky from the middle left exposure and just the bright highlights from the middle right exposure - which is where that luminosity mask comes in handy!
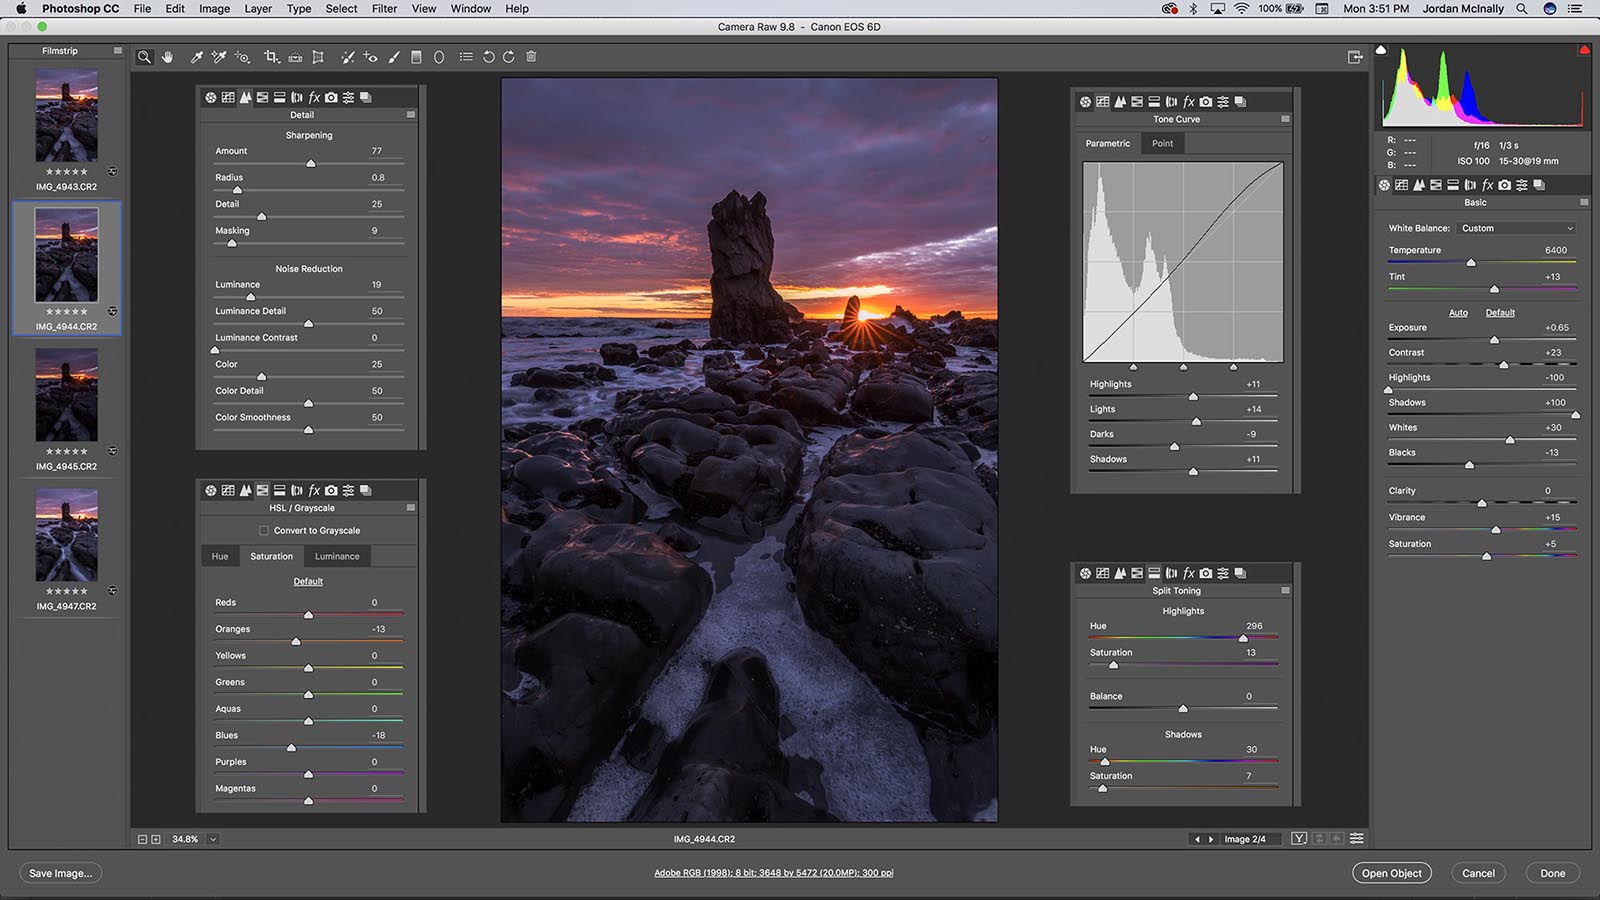
I opened all 4 in Camera RAW, heres my RAW processing, I added the Sharpening, Tone Curve, HSL & Split Toning tabs to show all adjustments;
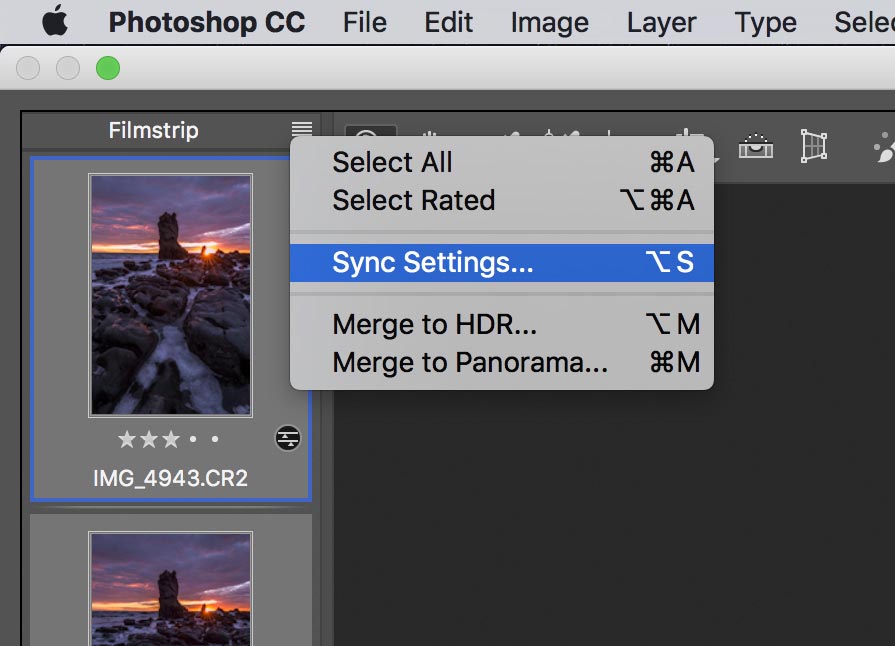
Sync the settings to all images by clicking one image, hitting command 'A' then choosing 'Sync Settings' in the menu up the top left;
Now you need to match each exposure, paying attention the area of the exposure you will use. I have labelled each shot on the left with its exposure adjustment and circled in green the area I plan to use when blending.
*NOTE* this is not a view option in Camera RAW, I pasted each image on top of a screen shot.

As you can see, I chose to use the sunstar from shot 1 as it had faded a lot by the time I took shot 4.
I processed shot 2 as my base exposure to get an idea of what the overall exposure would look like, but made shot 4 slightly brighter to emphasise the water, also knowing that I will add a vignette later in processing to darken the corners.
Shot 3 I kept quite dark as I was only focusing on the circled bright areas, looking to keep as much information in those highlights to blend into the sky from shot 2.
Now open them into photoshop and copy/paste (Command 'A', Command 'C' then Command 'V' to paste) each image on top of your main exposure.
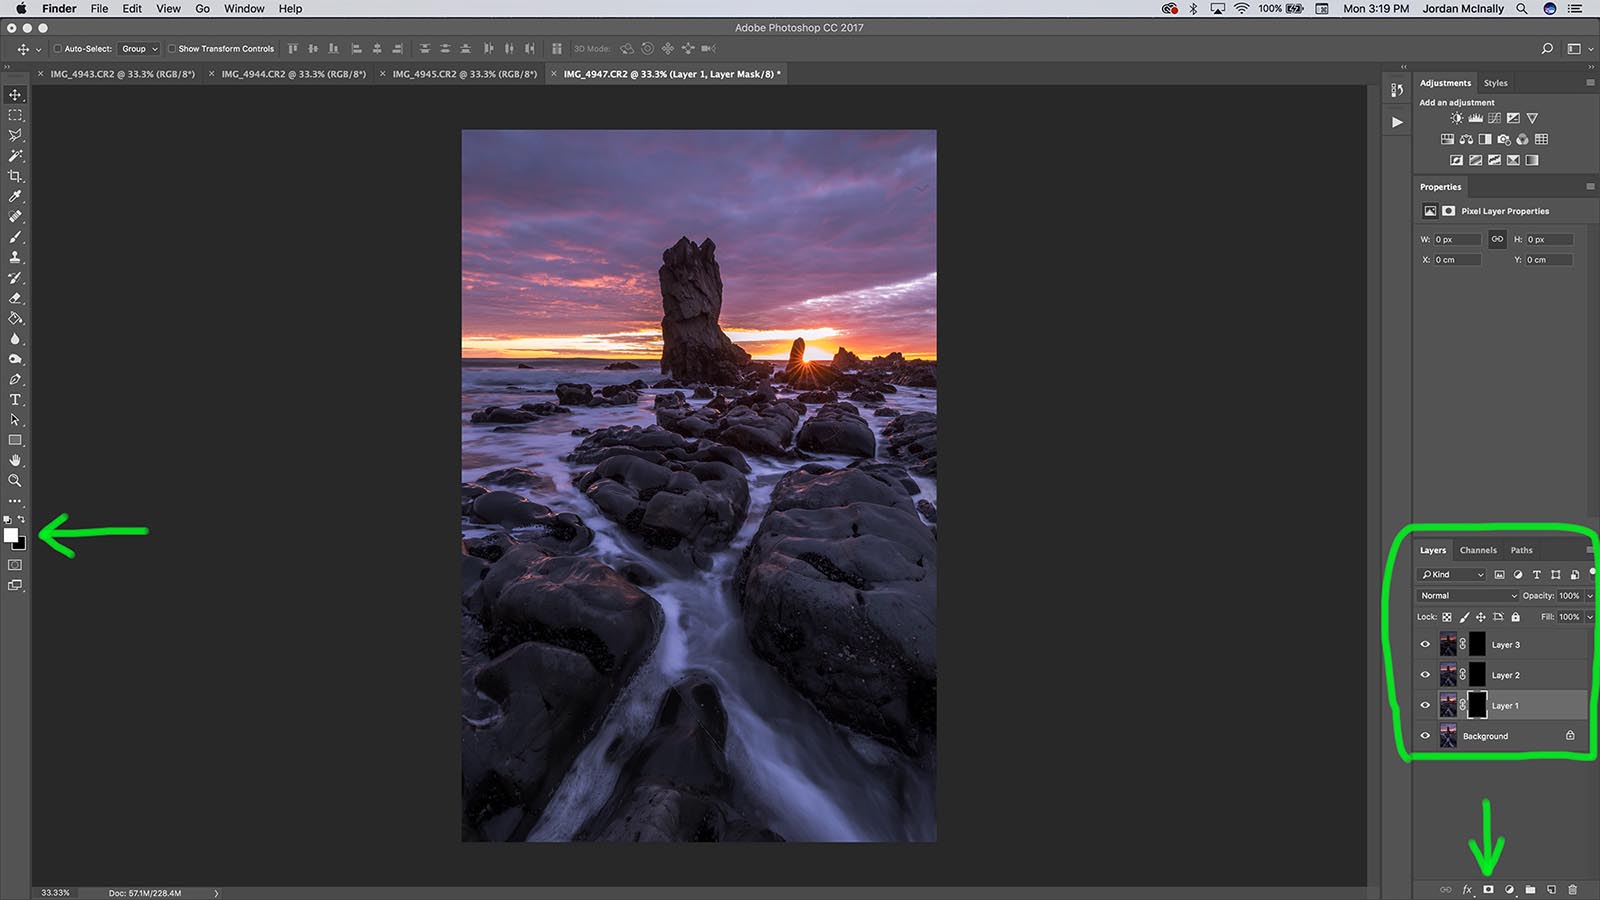
I chose the brighter image 4 for the base in this one, followed by shot 1 for the sun star, shot 2 for the sky and shot 3 for the highlights. (Usually you will only be working with 2 images for luminosity mask exposure blending which makes it easier.) You need to make sure that you place the darker image (shot 3 for highlights) on top so it can be masked in over the top of the lighter exposure.
Now add a layer mask to each image (except the background layer). To do this, click the button the green arrow is pointing to at the bottom right when clicked on each layer. If you hold option (or command depending on your current colour being black or white, green arrow on the left shows the colour picker) while doing this, it will make the layer mask black and that layer invisible which is what we want for now. Alternatively you can use the fill tool 'G' to fill the mask black, or click either 'Command, Delete' or 'Option, Delete' which switches between black & white for the mask fill.
Now using a brush with an opacity around 33%, a hardness of 0% to avoid harsh edges and a flow around 30% - 45%, I painted in the sun star where I wanted it;

The red shows which part of the layer mask is inactive. Here it was important to make sure the exposures of these to images are exactly the same so the blend looks seamless, even when just roughly painting the layer mask in.
Then I painted in the sky exposure using a brush opacity of 100%, roughly following the horizon line with a larger brush size and painting right over the big rock, then zooming in and using a smaller brush size to be more accurate, I cleaned up the edges to ensure the was no overlap in the waves and painted out the rock;
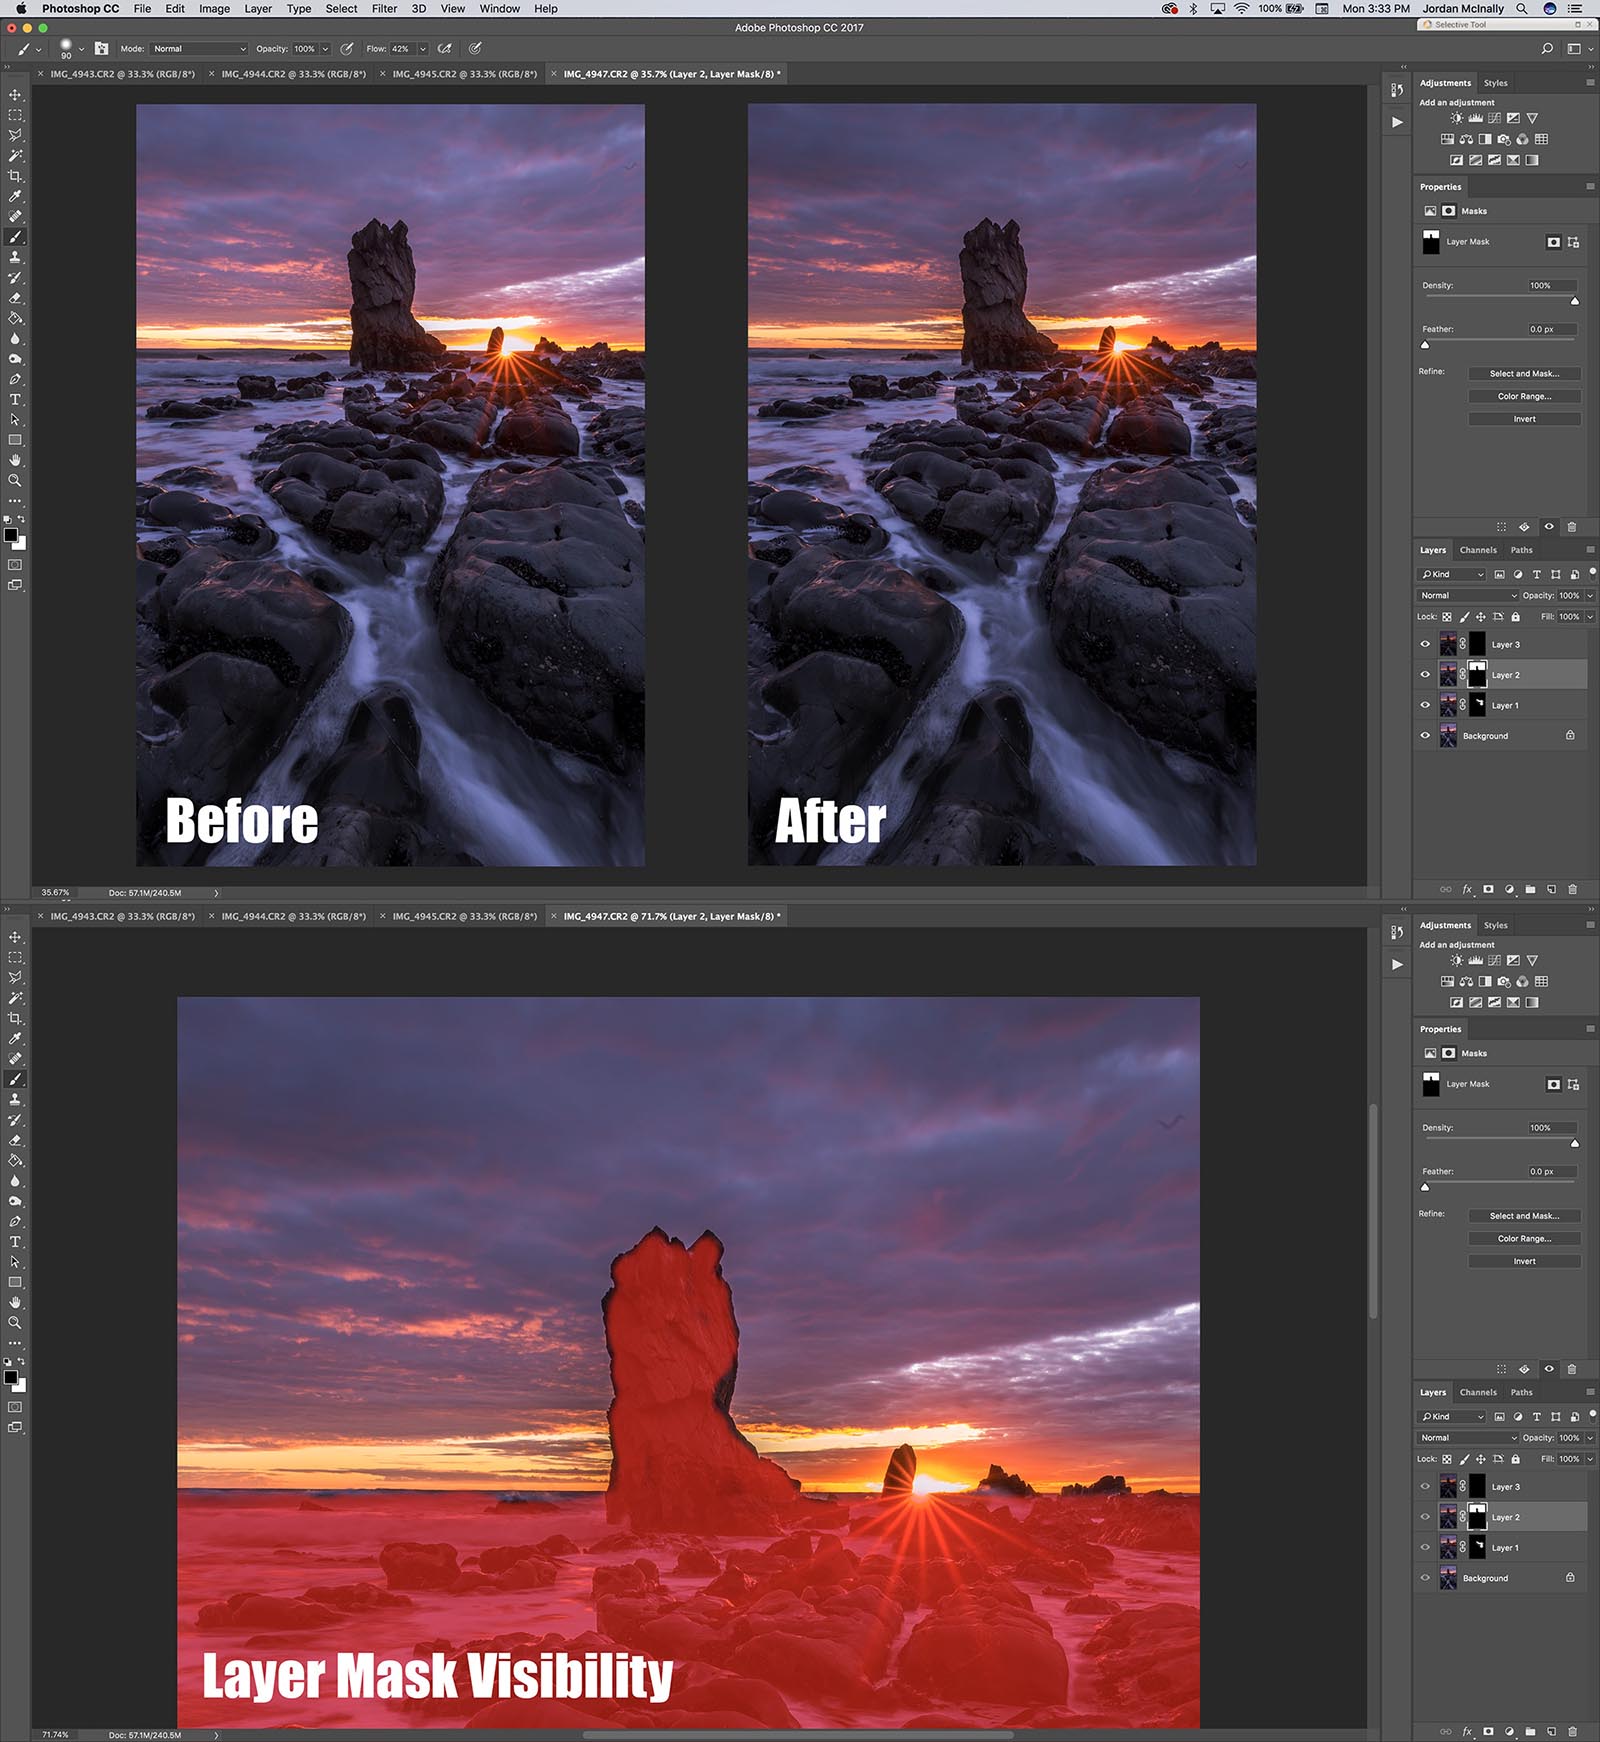
I left a little bit of the big rock on the right hand side from the darker exposure as it had some nice red light on it, as well as the other 3 smaller rocks that stuck up on the right as they had some nice wave splashes and there wasn't much detail to be gained by painting back the brighter exposure.
Now the part you've all been waiting for..
I use Tony Kuypers Luminosity Masks (thanks Tony!!) which you can download for free here;
http://goodlight.us/writing/tk-mini-panel/tk-mini-panel-1.html
This panel is slightly different to mine but easier to use so hopefully will make sense :)

Through the actions panel (top right big triangle), you will have 3 Luminosity Mask options of either Levels, Curves or Channels, each with their 5 options of luminosity. Curves or Levels will give you an adjustment layer that effects the tonal values of your chosen mask, but for blending we want to use the Channels option. I've found that the Bright Lights mask works best for exposure blending in most cases. To play the action, hit the smaller triangle at the bottom of the actions tab.

This will bring up the Bright Lights mask in the channels tab, hold 'Command' and click on it to make the masks selection active, you will notice the marching ants appear dancing around the brighter areas of the image;

Once you have your luminosity mask selected, make sure you are clicked on the layer mask of your darker exposure in the Layers tab. Select your brush tool and again, set your opacity to around 33% and set to a small brush size big enough to cover the area of your selection. You can also hit 'Command H' to hide the marching ants selection which makes it easier to see what your brushing in. Brush over the brighter areas a few times until you are happy with how it looks, this process is all about being gentle with the blending so it looks real and not too dark in the bright areas.

As you can see, for this image it was quite a subtle adjustment that I could have probably got away without doing, but this technique certainly has its uses!

Now at this point, make sure you deselect your mask, especially if you have hidden the marching ants! Other wise every adjustment you try to make will only effect that bright lights selection, so just hit 'Command D' or head up to the Select drop down menu up the top and choose deselect.
Now you have your exposure blended image with all its beautiful dynamic range to play with! From this point I would also do a Levels adjustment with the Bright Lights mask to bring back a little more information and colour into the highlights, as well as a Curves adjustment with the Lights mask. As complicated as it sounds, once all your luminosity masks are loaded into photoshop, its just a click of a button or 2 and you have an adjustment ready to go in your layers tab :)
By this point I was quite happy with the image, but I have a process that makes things look awesome using Nik Color Efex Pro 4 filters, I'll release another tutorial on using this software for processing soon, but heres a look at the layers in my PSD file for this image finished;
I hope this helps guys! Please don't hesitate to get in contact if your having any trouble with this process, I'm here to help!
Flick me a message on facebook;
https://www.facebook.com/undersoulphotography/
Or send me an email here;